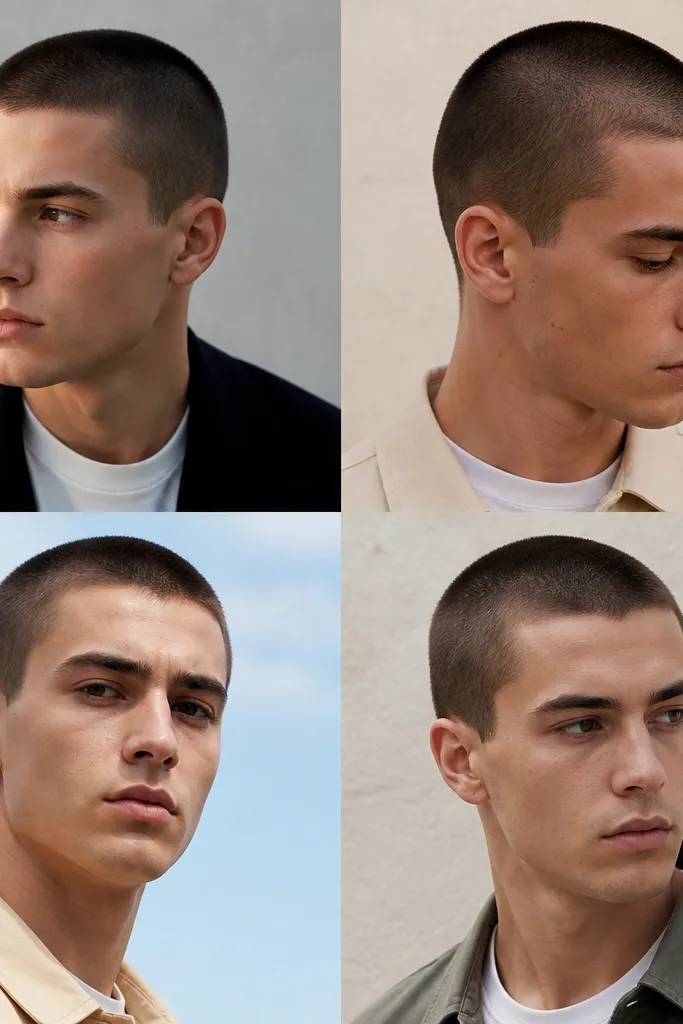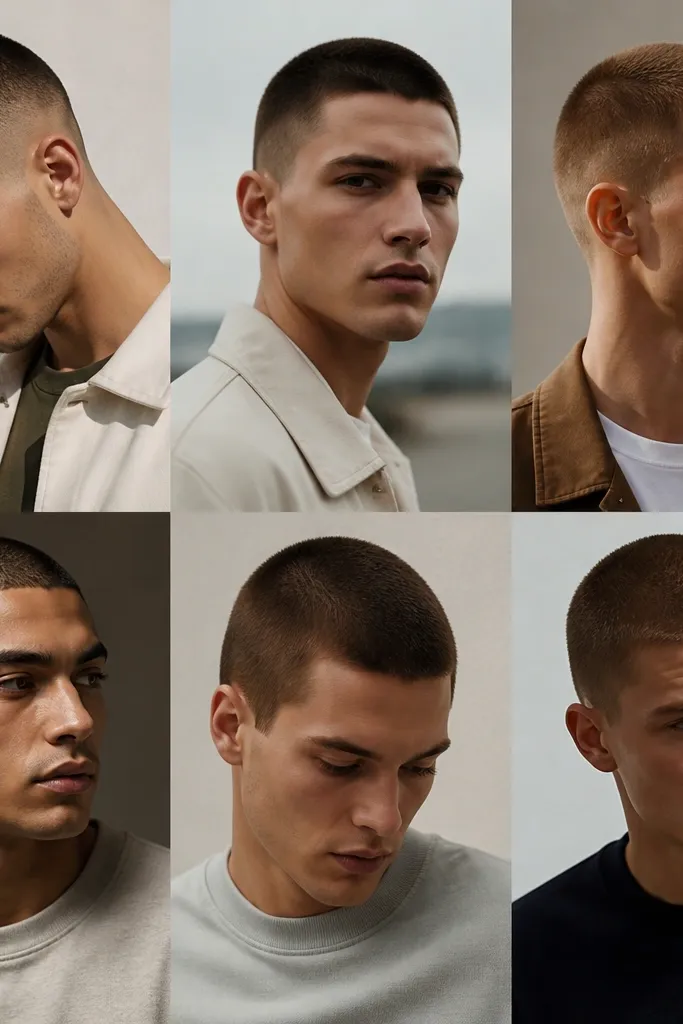
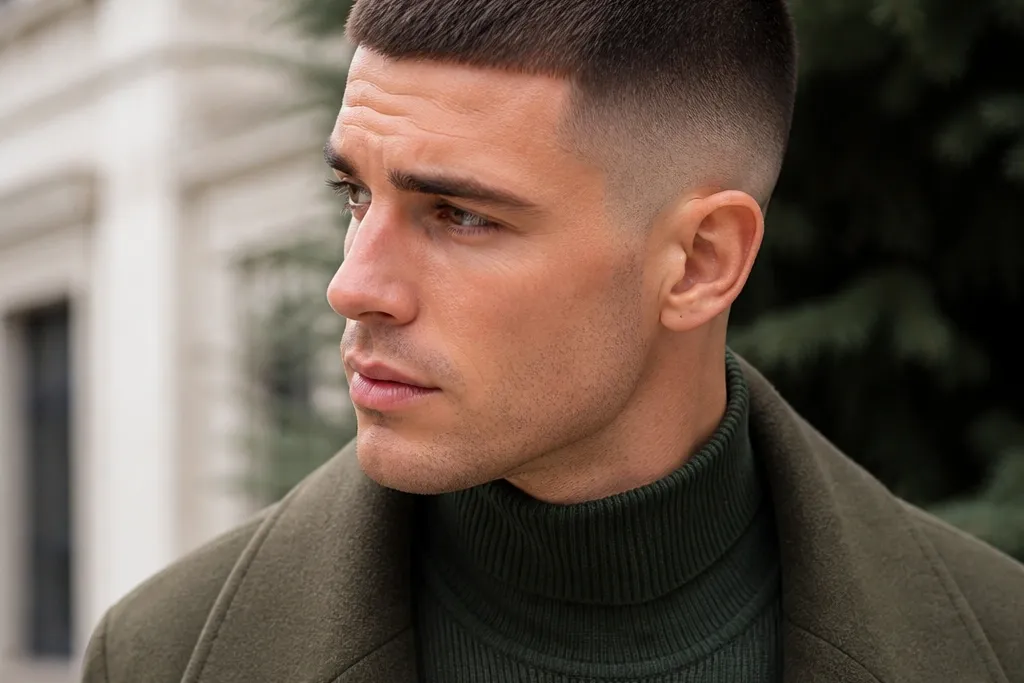
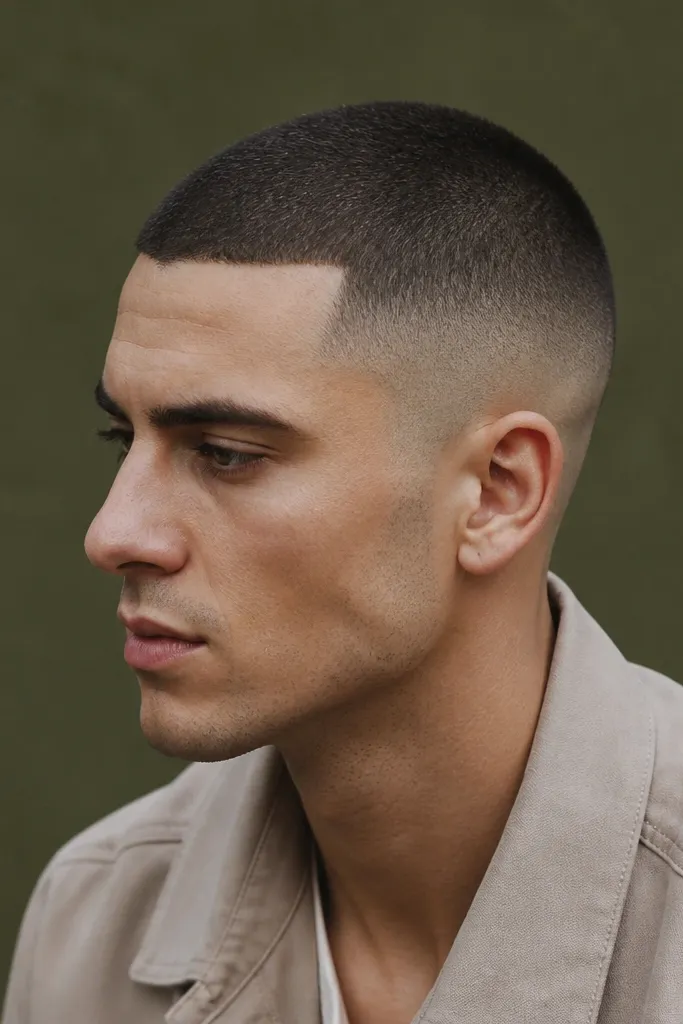
1. 1/2-Inch Top High Fade with Glassy Skin Fade Edge
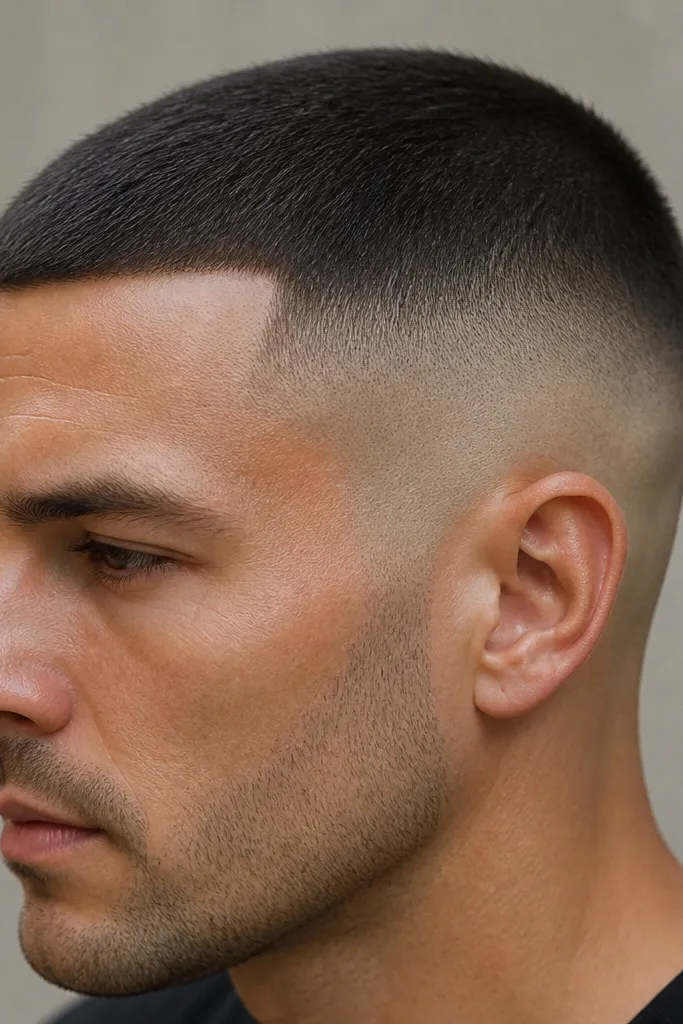
This is the "walk out the door and look put together" version. The top stays at 1/2 inch so it doesn't feel heavy in summer, and the high fade rises above the ear line to sharpen the skull shape. The near-skin edge at the temples makes the face look brighter, especially if you have light stubble or a clean jawline. It works best on straight or slightly coarse hair because the top holds a uniform length without looking see-through. For darker hair, the skin fade contrast looks extra clean; for lighter hair, ask for a slightly less aggressive skin blend so it doesn't look patchy.
Start by telling your barber you want the top cut with a 1/2-inch guard, no taper on top. Then request a high fade that starts at the top of the ears and blends up in at least three steps before it reaches skin around the temples. Finally, keep the neckline natural - no hard line - so the transition doesn't look like a helmet. Style it by skipping oils and using a tiny matte wax only on the top so it stays flat.
Try thisAsk for the fade to be cleaned with a straight-edge pass at the temples, then stop there - too much line work makes it look harsh.
Watch outDon't let the barber keep the sides too long; a thick side guard ruins the "high fade" look and reads sloppy.
2. 3/4-Inch Top High Fade with Soft Temple Blend
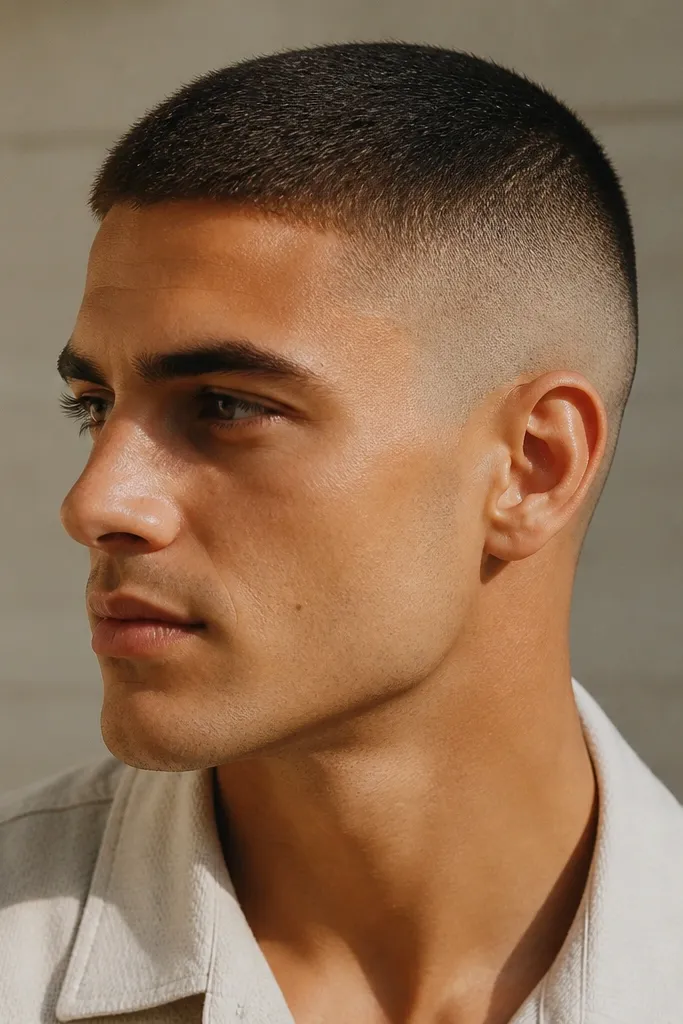
I like this when the hair on your sides grows in a little faster than the top. The 3/4-inch top gives you enough weight to prevent the buzz from sticking straight out, especially if your hair is wavy. The soft temple blend keeps the fade from looking too sharp against a rounder face. If you have a medium to deep skin tone, the blend reads smooth and polished without needing a hard line. This style also works well for winter because the slightly longer top handles dry air without looking spiky.
Start with a 3/4-inch guard on top, cut level across the head. Then ask for a high fade that begins around the upper ear and blends down to a short guard first, then transitions to skin only lightly at the very edge. Finally, keep the temple area blended, not lined - you want a smooth gradient. At home, use a damp towel to flatten the top for 30 seconds, then air-dry or pat dry.
Try thisIf your hair gets frizzy, use a pea-sized amount of matte cream on dry hair and press it flat with your palms.
Watch outAvoid a skin fade that hits too early on the temples; it makes the sides look thin and the head shape looks uneven.
3. High Fade with Buzzed Fringe Line (No Comb Over)
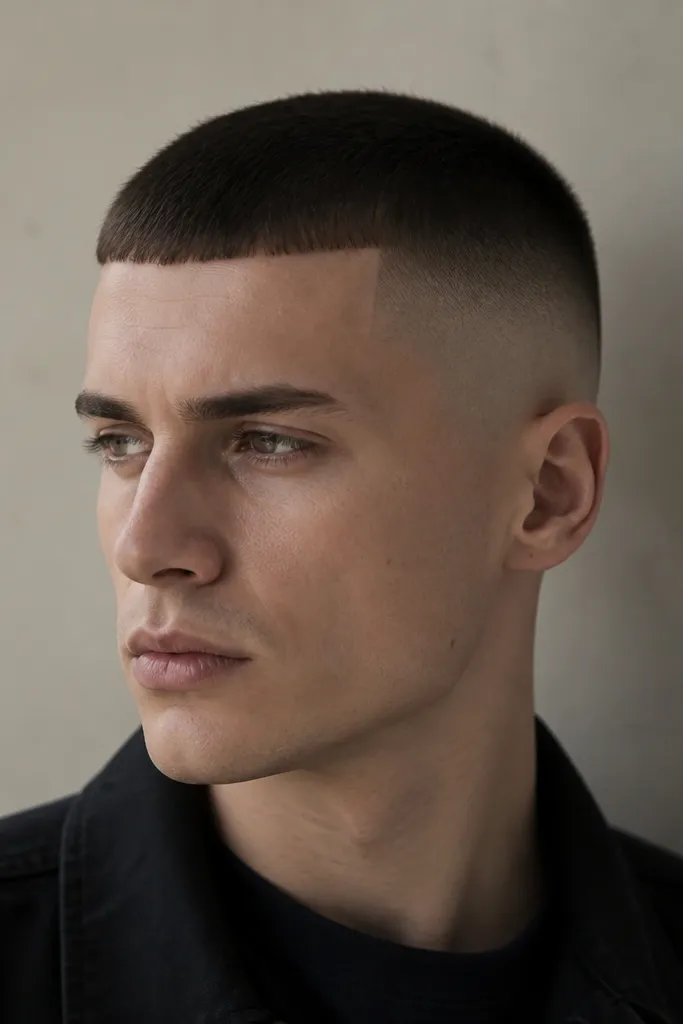
This one gives you a "designed" look without trying to style anything. The fringe line is cut so the front reads as a flat strip, which helps if your hairline is uneven or you have a widow's peak that shows too much. The high fade keeps the focus on the face and prevents the front from looking heavy. It's also great for people who want a bold appearance but don't want a textured top that needs product. The fringe line looks best on straight hair and on hair that doesn't curl forward.
Tell your barber to cut the top to 1/2 inch, then define a straight fringe edge about 1/4 inch above your eyebrows. Ask for the high fade to start at the top of the ears and blend cleanly up toward the crown. Keep the front edge sharp only at the outline; don't create a hard ridge. At home, no combing - just press the fringe flat with your hands after washing.
Try thisBring a photo in daylight and point to the exact front edge - the difference between subtle and harsh is one haircut away.
Watch outDon't ask for a long fringe; a longer front buzz turns into an awkward "helmet" layer as it grows.
4. Zero-Guard Top to Skin High Fade for Maximum Contrast
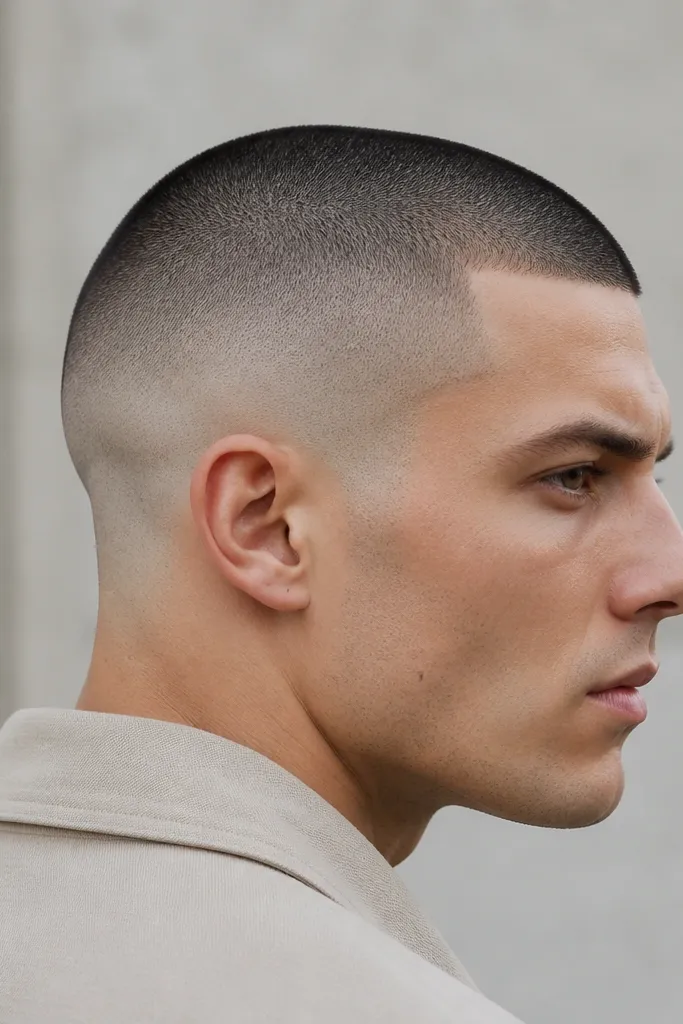
If you want the boldest version of buzz cut mens seasonal evergreen, this is it. A zero-guard top gives you a clean silhouette that doesn't show unevenness as it grows out. The high skin fade makes the head look sharply outlined, which is especially flattering if you have a defined jaw or strong cheekbones. It also works when you're dealing with a receding hairline because it removes the transition altogether. The only downside is it shows scalp texture, so if your scalp is sensitive, you'll need to be more careful with sunscreen and after-shower moisture.
Start with a zero guard on top - tell your barber "all over zero, then blend the sides into the fade." Next, request a high fade that uses skin near the temples and mid-upper ear area, with multiple guard steps between so it doesn't look like a cutout. Finish with a natural neckline so the back doesn't look like a hard block. After washing, pat dry and apply a thin layer of lightweight lotion only if your scalp feels tight.
Try thisUse a matte SPF on your scalp when you'll be outside - shine plus sun makes the scalp look uneven fast.
Watch outAvoid skipping scalp care; dry, flaky skin under a skin fade reads worse than you think.
5. 1-Inch Top High Fade with Crown Flat-Top Buzz
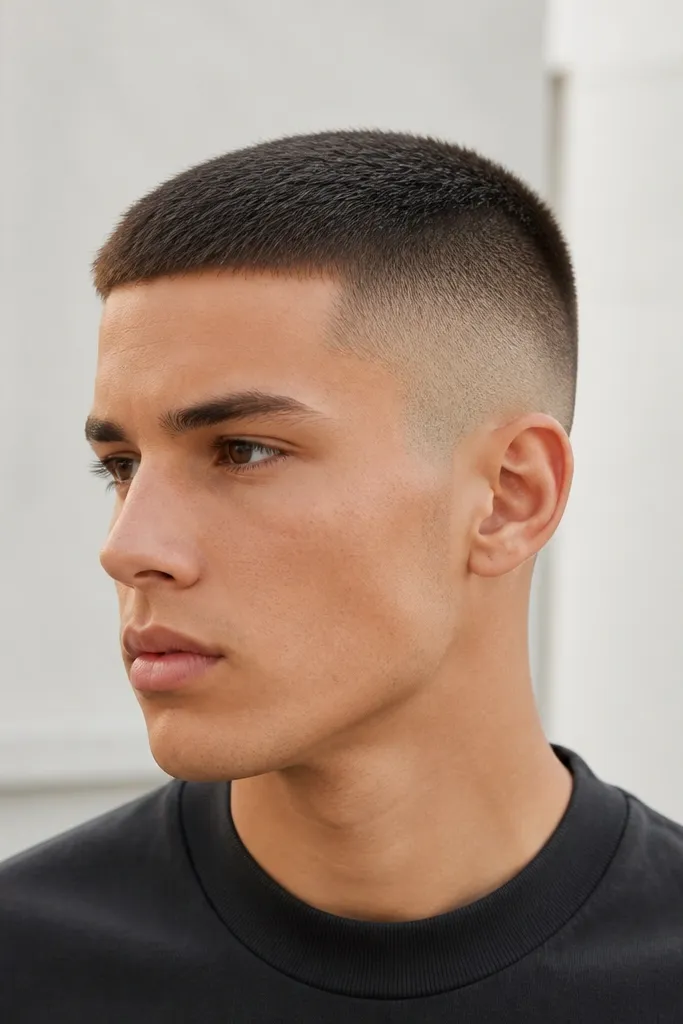
This is the version I pick when I want buzz-cut energy but still want shape. The 1-inch top gives you enough length to keep a flat crown, which looks intentional even when you don't style. The high fade frames the crown and keeps the sides from expanding as the hair grows. If your face is more oval, the extra top length balances it and makes the whole head look fuller. For people with thicker hair, this style prevents the top from looking like a helmet because the flat cut controls bulk.
Start with a 1-inch guard on top and ask for a flat, level crown rather than a rounded buzz. Then request a high fade that begins at the upper ear and blends up gradually, leaving the top fully uniform. Keep the transition tight so the crown doesn't look like it floats. Style by using a matte pomade or cream - rub a pea size between fingers, then press the top flat with your palms in one direction.
Try thisIf the top lifts during the day, mist with water, press flat, and let it dry naturally.
Watch outAvoid letting the barber taper the top down at the crown; it kills the flat-top silhouette.
6. High Fade with 2-Line Back Neck Detail
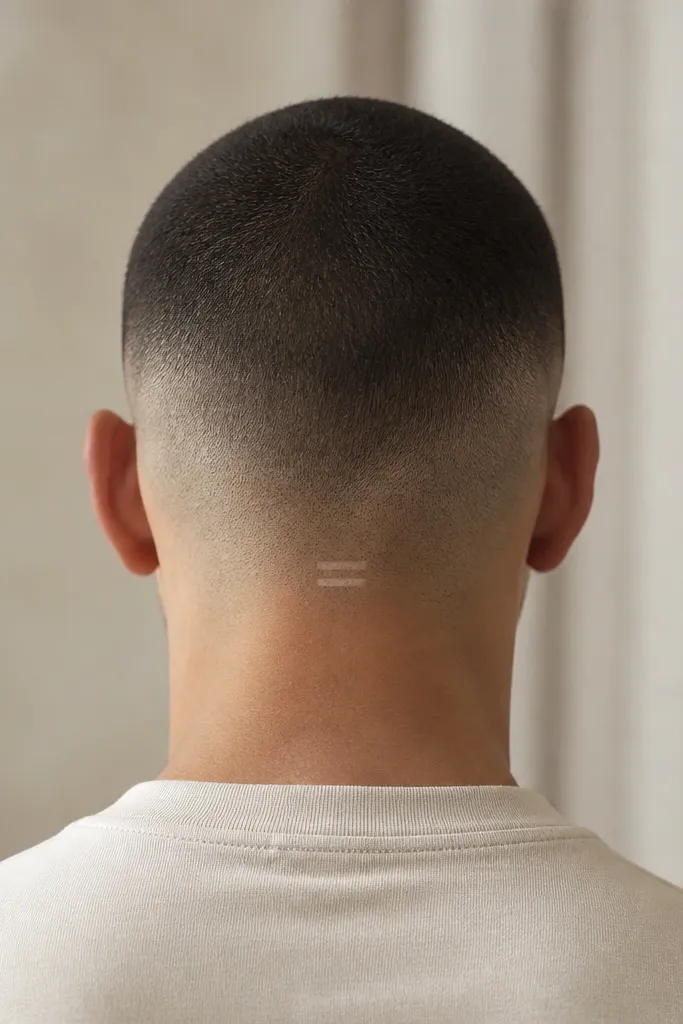
This is for when you want bold appearance without needing longer hair. The two tiny lines at the back neck act like a hidden detail - you only see it when you turn your head, and it looks clean when it's small. The high fade keeps everything tight so the lines don't turn into a messy pattern. This works best if your neckline grows evenly; if it grows patchy, the lines will blur faster. I've worn this to events and casual weekends, and it stays looking sharp as long as you keep up with touch-ups.
Start with a buzz length on top around 1/2 to 3/4 inch, then keep the fade high and blended. Ask the barber to shave two short, parallel lines into the back neckline only, about 1 inch long each and spaced a few millimeters apart. Keep the neckline itself natural - don't make a full hard collar. For styling, no product is needed; just keep the back clean by rinsing thoroughly so sweat doesn't dry into flakes.
Try thisIf you hate maintenance, ask for the lines to be "lightly etched" instead of deeply carved.
Watch outDon't go long on the lines; once they reach more than an inch, they look like a mistake as they grow out.
7. Skin Fade High + Beard Blend Fade Combo
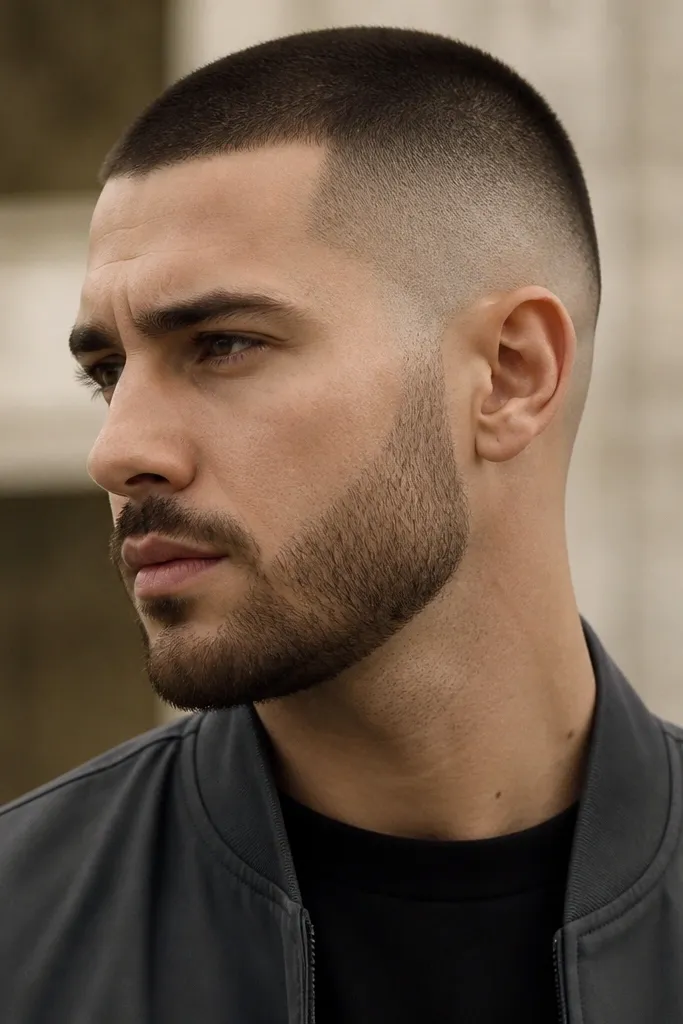
When your beard is part of your look, the cleanest buzz cut is the one that matches it. A high skin fade on the sides pairs well with a short beard fade so the jawline looks continuous. If you have a thicker beard, this draws attention to your face shape and makes the whole look more intentional. For lighter beard growth, keep the beard slightly longer at the chin so you don't get patchy areas against skin fade contrast. This is also a strong look for men and for women who wear facial hair - it reads sharp and graphic.
Start with a short top at 1/2 inch, then ask for the high fade to hit skin near the temples. Then have the barber line up the beard fade so it meets the fade at the same height - usually around the middle of the sideburn area. Keep the beard cheeks blended with clippers, not scissor work. Finish by using a tiny amount of beard oil or balm on the beard only, and keep the top dry and matte.
Try thisBring your beard comb length (mine is a 1/2-inch setting) so the barber matches the top and beard lengths.
Watch outAvoid a beard neckline that sits too high; it cuts the face in half next to a high fade.
8. High Fade with Side Part Buzz Line (Hidden Part)
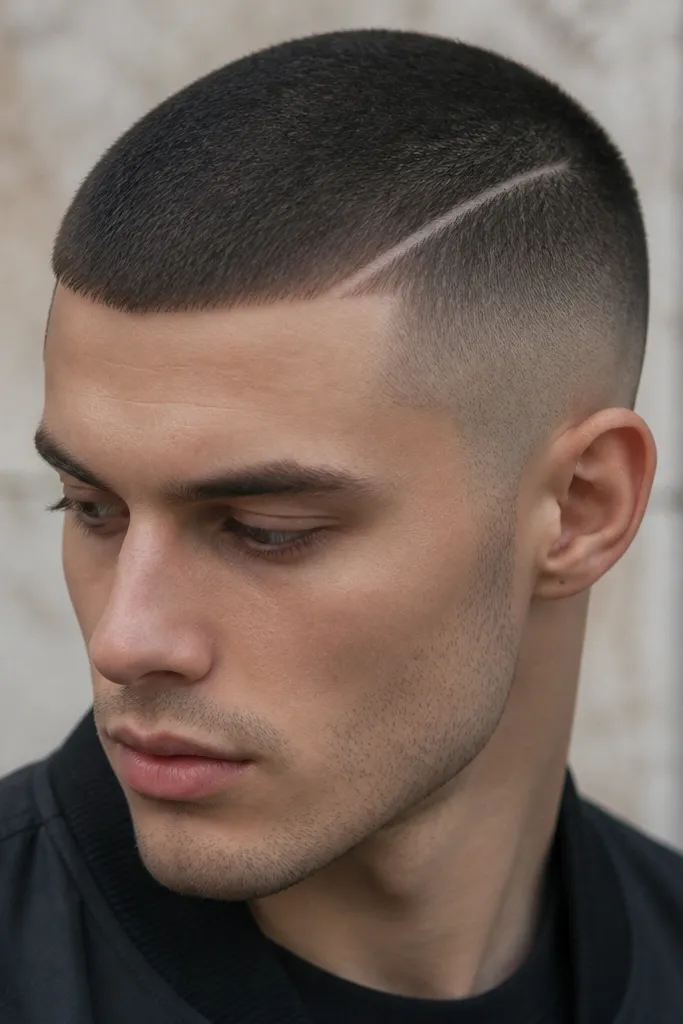
This is the "I want a part without hair" trick. The part line is shaved into the top so you get direction and structure, but the rest stays a buzz. A high fade makes that line pop because the sides are tight and the top is short. It's great if your hair grows in slightly different directions or if you want your face to look a bit more angular. Works on most hair types, but it looks best when the top is 1/2 to 3/4 inch and the line is thin.
Start with a 1/2-inch buzz on top. Then ask your barber to shave a thin part line about 1 to 1.5 inches long starting at the front third of your scalp and running back slightly - no deep groove. Request a high fade that blends up behind the ear and keeps the sides tight. At home, don't use a comb - just press the top toward the part with your fingers after washing.
Try thisIf you sweat a lot, wash the part area daily for the first week; sweat buildup makes the shaved line look dull.
Watch outAvoid thick, wide part lines - they look like a scraped scar as the hair grows.
9. Buzz Cut Mens High Fade with Rounded Crown (No Flat Top)
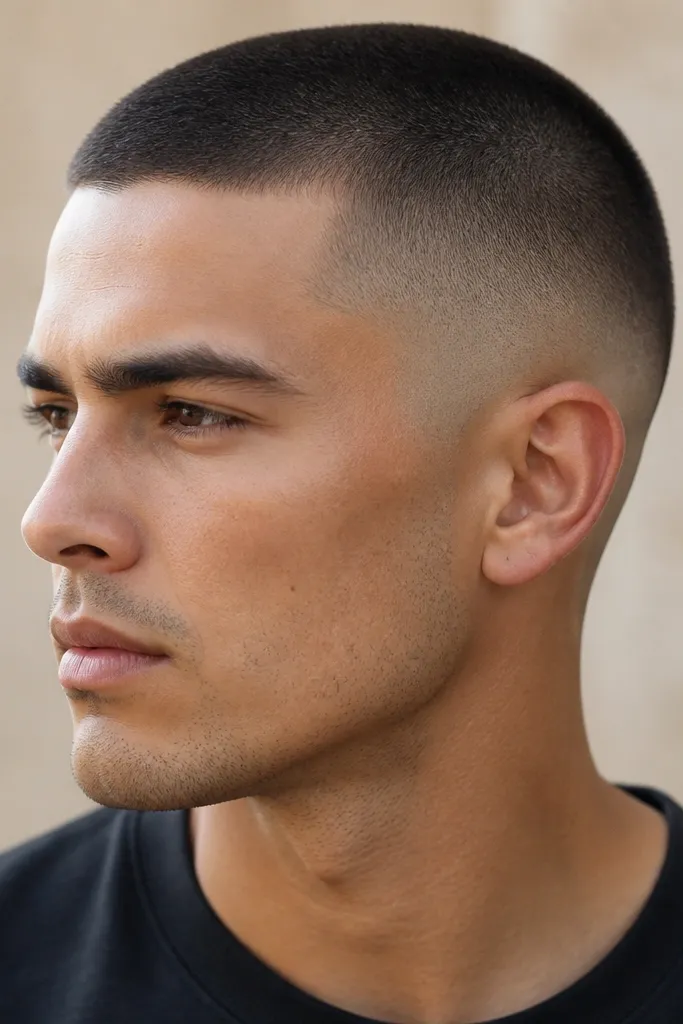
Some heads look better with a rounded crown than a flat one. This style keeps the top buzzed to around 5/8 to 3/4 inch, then the barber rounds the crown so it follows your natural skull curve. The high fade still gives you that clean outline, but the rounded top softens the silhouette. If you have broad shoulders or a stockier build, the rounded crown looks balanced and less boxy. It also reads natural as it grows because the shape is forgiving.
Start with a 5/8-inch guard on top and ask for a rounded crown rather than a flat level cut. Then request a high fade that starts at the top of the ears and blends up with multiple guard steps. Keep the sides matte - no shine product on top either. Style by using a hair dryer on cool or low heat for 20 seconds to set the direction, then stop.
Try thisIf your crown tends to puff, dry it with your fingers pressing the hair down in a single direction.
Watch outDon't over-blend into the top; if the fade eats too much into the crown, the top looks uneven.
10. High Fade with Vertical Buzz Pattern on Top (1/2-Inch Grain)
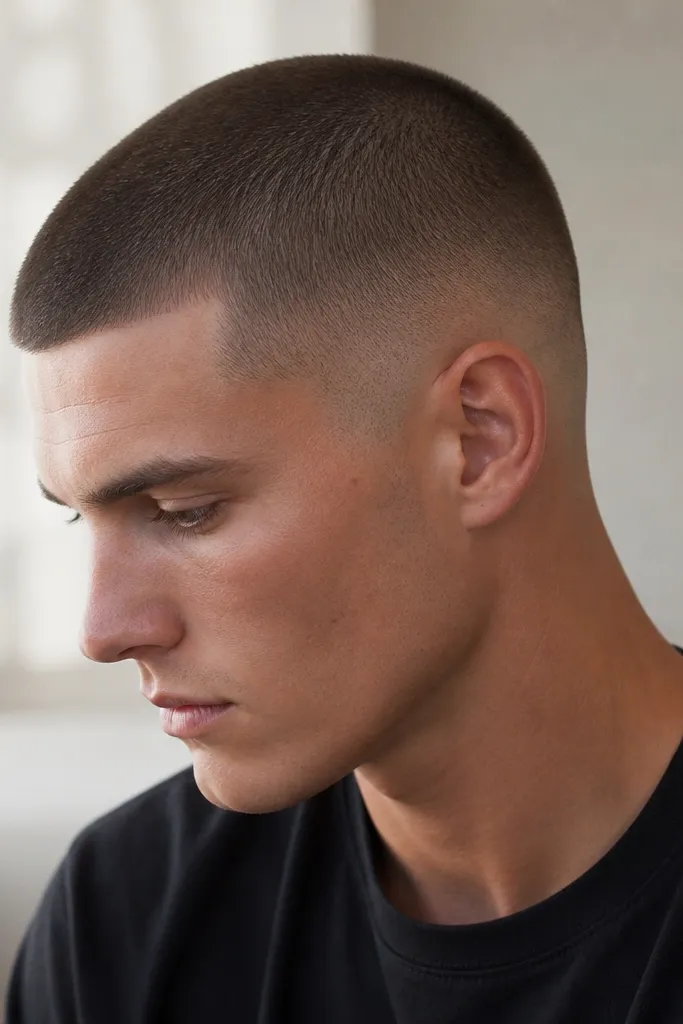
This is subtle texture, not a full design. The top is buzzed at 1/2 inch, and the barber uses vertical clipper passes so the light catches in stripes. A high fade makes the pattern show up clearly because the sides are smooth and short. If you have medium to thick hair, the pattern holds better and looks more intentional. For fine hair, the pattern can disappear quickly, so keep the top at 3/4 inch if you want the texture to stay visible.
Start by keeping the top at 1/2 inch. Ask your barber to buzz the top in vertical sections, all in the same direction, then blend only at the edges. Request a high fade that stays tight around the sides so the top texture is the only visual detail. At home, use a matte paste very sparingly and rub it between hands, then press the top down so the stripes catch light.
Try thisTake one photo in direct sunlight after your haircut - it tells you if the stripe direction is working for your hair.
Watch outAvoid mixing directions on the top; random clipper passes make it look patchy instead of designed.
11. High Fade with Short Spiky Top (Buzz + Micro Texture)
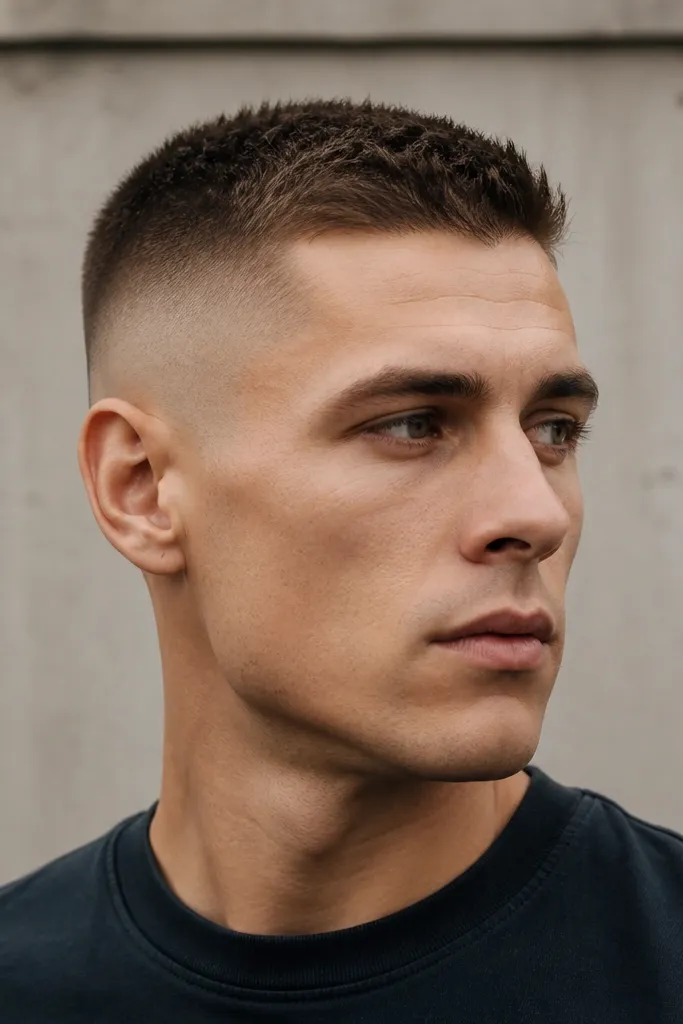
This one gives motion even when the hair is short. The top stays around 5/8 to 3/4 inch, but the barber uses light clipper lifts and a tiny bit of scissor cleanup to create micro texture. The high fade keeps the sides tight so the spikes don't look like a helmet. If you have a round face, the upward texture adds height and makes the face look longer. This also works on coarse hair where spikes hold without product overload.
Start with a 5/8-inch top and ask for micro texture using clipper over-comb or light scissor work at the top. Then request a high fade starting at the upper ear and blending up cleanly. Keep the top slightly longer at the front for lift, but don't overdo it. Style by applying a pea-sized matte paste to dry hair, then lift the front with your fingers and set it for 10 seconds.
Try thisIf your spikes fall by noon, switch from wax to matte paste - wax weighs it down.
Watch outAvoid shiny gel; it makes short buzz spikes look greasy fast.
12. High Fade with Textured Top Buzz for Curly Hair
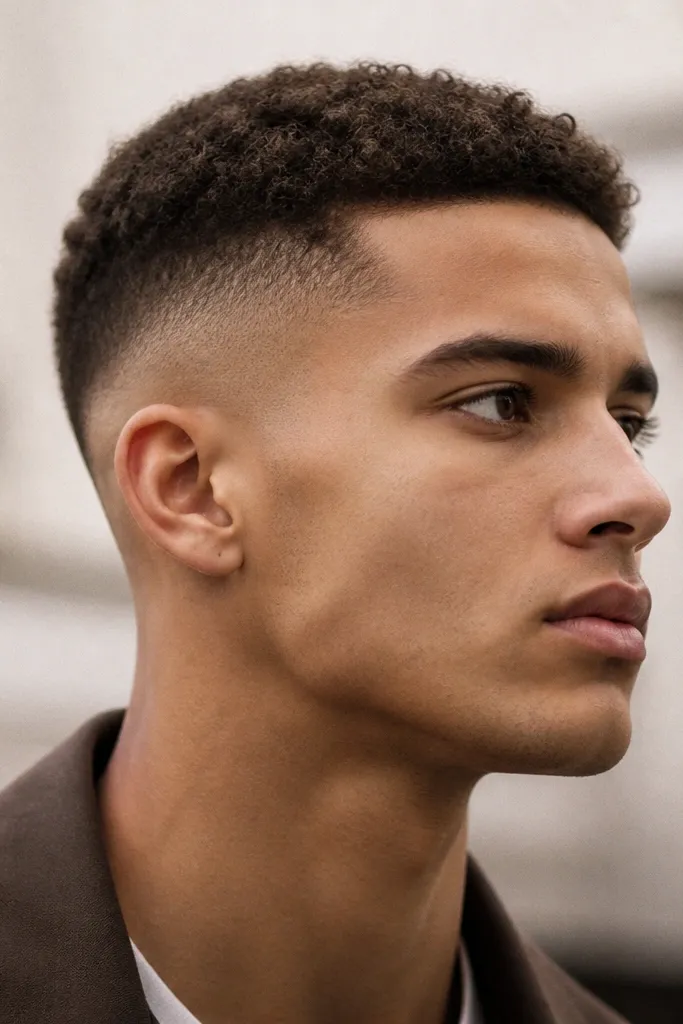
Curly hair needs a different approach because a flat buzz can turn into uneven fuzz. This style keeps the top at about 3/4 inch so the curls have shape, and the barber blends the sides high without over-cutting the texture. The result is a controlled, even look that doesn't turn patchy after a week. It's especially flattering if you have a medium or deep skin tone because the contrast between coils and fade looks intentional. For very tight curls, the top can shrink - plan that with your barber and aim slightly longer if you want it to read as a buzz, not stubble.
Start by asking for a 3/4-inch guard on top, then tell the barber to preserve curl shape rather than shaving it down to flat. Request a high fade that blends down to a short guard at the sides, but keep the top line clean so curls don't spill over. At home, use a curl cream or a small amount of leave-in spray and scrunch, then air-dry. If you need it to look sharper for an event, use a hair dryer on low heat while scrunching.
Try thisAsk for the top to be cut when your hair is dry or at least not soaking wet - curly shrinkage changes the length.
Watch outAvoid cutting curly tops too short; it makes the fade look fine and the top look patchy.
13. High Fade with Straight-Line Eyebrow-Length Fringe
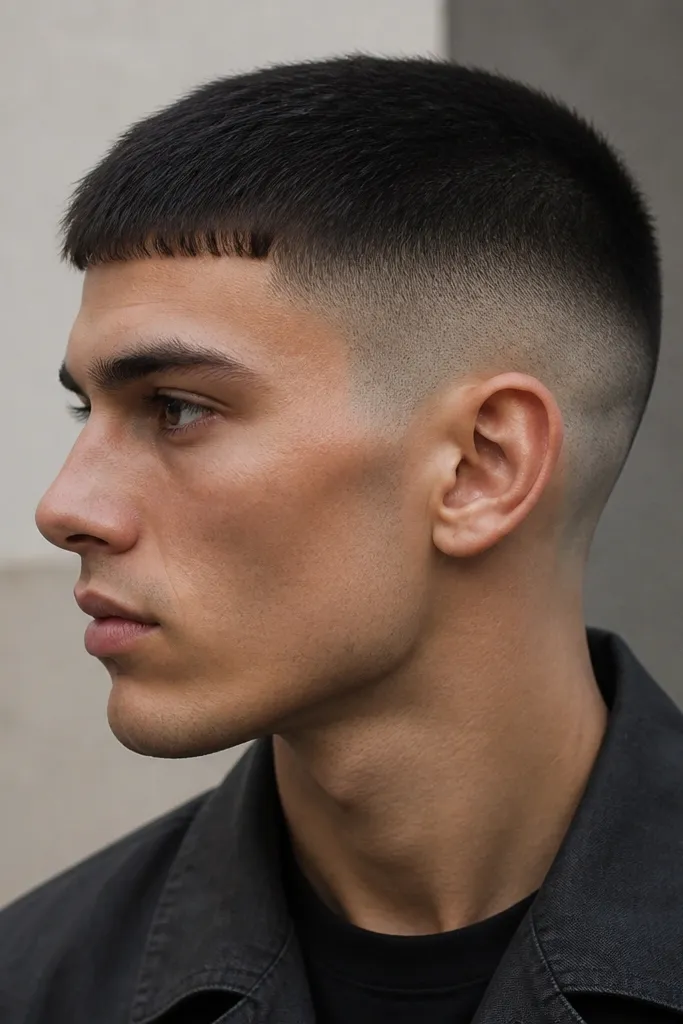
This is a bold, fashion-forward take that still stays wearable. The front is kept longer than the rest of the buzz so you get a strong horizontal line at the forehead, which frames the eyes. The high fade prevents the longer front from looking heavy because the sides stay clean. This works best for people with straight or slightly wavy hair who want structure rather than texture. If you have a shorter forehead, keep the fringe closer to eyebrow height only - any longer and it visually shortens your face.
Start by cutting the top to about 1 inch at the front, then blend back down to 1/2 inch toward the crown so it reads as a fringe. Ask for the high fade to start at the top of the ears with a tight blend. Keep the fringe edge straight - have the barber use a comb and clipper to define the line. Style by using a matte paste and pressing the fringe flat with two fingers from center outward.
Try thisIf you wear glasses, this fringe length makes your frames look sharper - aim for the fringe edge to sit just above the top rim.
Watch outAvoid a fringe that curves; a curved buzz fringe looks accidental and grows into a weird patch.
14. High Fade with Short Afro-Style Buzz on Top
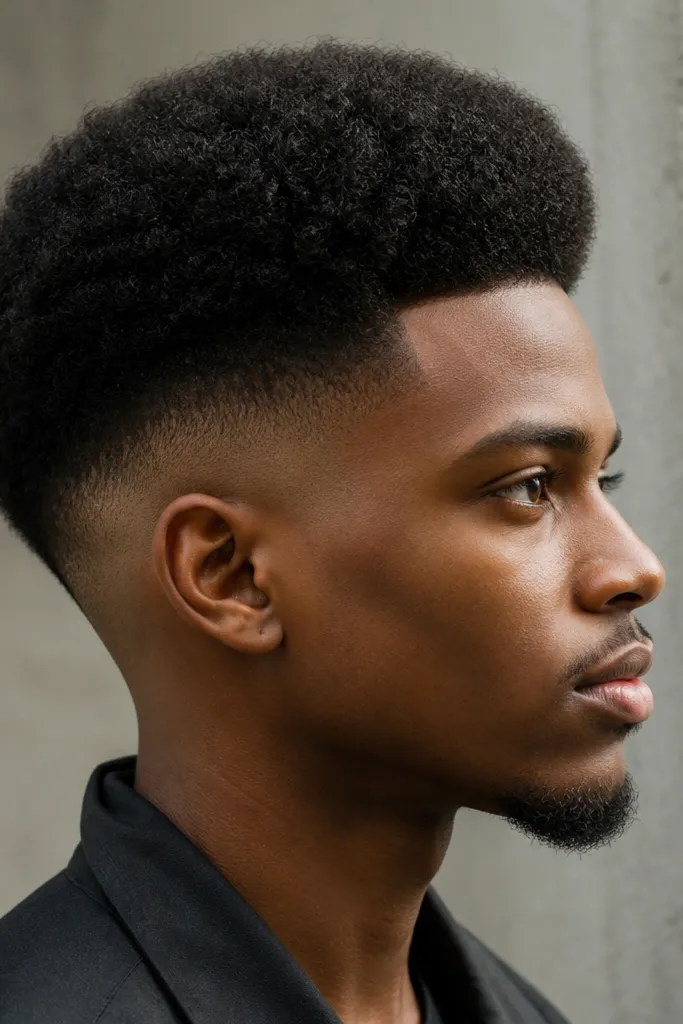
This works when you want volume but still want the buzz-cut simplicity. The top is buzzed to around 1 inch, but the hair is left with its natural shape so it puffs slightly. A high fade on the sides keeps it from getting too wide and makes the puff look intentional. If you have a fuller face, this adds balance by keeping the head from looking too narrow. It also looks great on coarser hair where the buzz naturally holds shape. For finer hair, you'll need a slightly longer top so it doesn't disappear.
Start with a 1-inch top and ask the barber to keep the crown rounded rather than shaving it flat. Request a high fade that reaches short guards around the sides, with a clean but smooth blend near the temples. Keep the edges around the forehead natural - no hard line - so the puff doesn't look like a separate cap. Style by applying a small amount of leave-in conditioner, then shake the hair and let it air-dry.
Try thisUse a satin pillowcase; it keeps the puff shape from getting flattened overnight.
Watch outAvoid over-drying after showers; dry top hair can puff unevenly and make the fade look messy.
15. High Fade with Micro Taper at the Crown Line
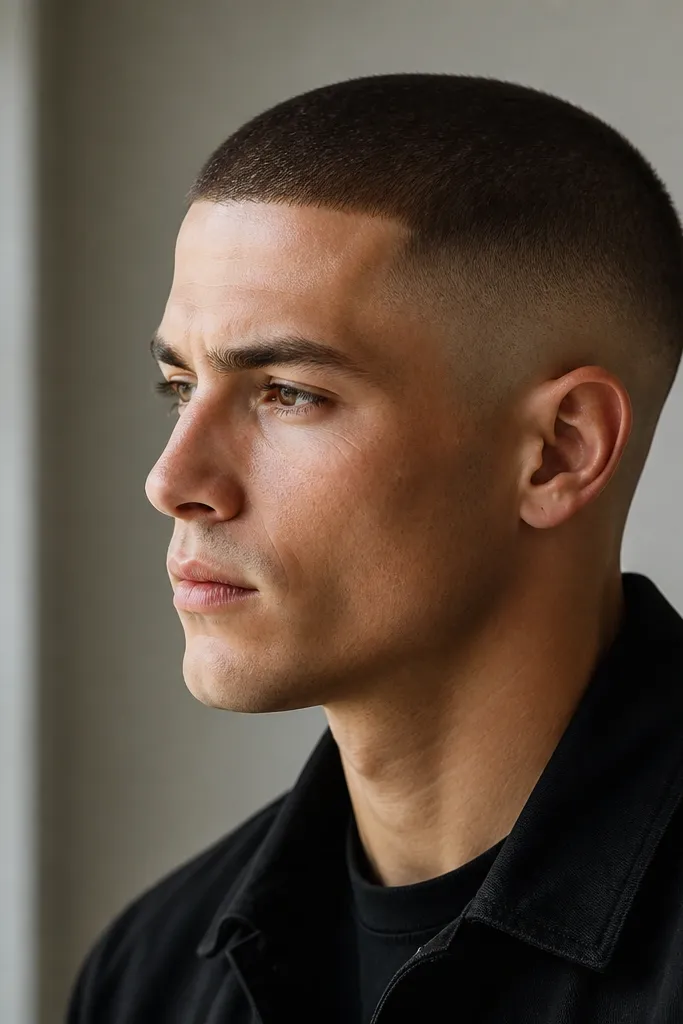
This is the "clean geometry" cut. The micro taper at the crown line takes the bulk down just a touch, so the head looks more proportioned. The high fade still gives you that bold outline, but the crown shape stays tidy when your hair grows. I like it for people with thick hair who hate bulk sticking out at the crown. It also looks good on lighter skin tones because the transitions stay smooth rather than creating harsh contrast. If your hair grows fast, the micro taper helps the grow-out look more even.
Start by cutting the top to 3/4 inch across the front and sides. Then ask for a micro taper at the crown line - keep it subtle, like a 1/4-inch reduction, not a shaved-down spot. Request the high fade starting at the upper ear with a smooth multi-step blend. Style with a matte cream and press the crown down lightly so the taper line stays invisible.
Try thisAsk for a mirror check at the crown - this style lives or dies on how subtle the taper is.
Watch outAvoid a strong crown taper; it makes the top look like it's shrinking oddly.
16. High Fade with Short Line-Up + Rounded Corners
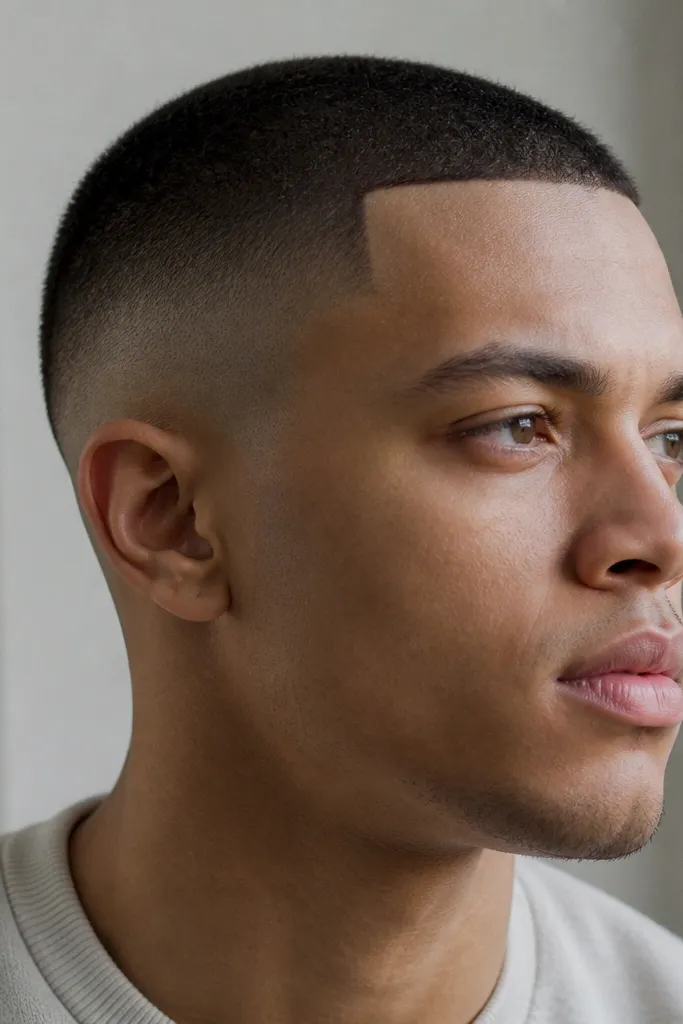
Edges matter more than people think with buzz cuts. This version uses a short line-up at the hairline with rounded corners so it looks sharp without looking like a stencil. The high fade keeps the sides tight, and the rounded corners soften the face shape. It works for almost everyone, but I especially like it if your hairline has a few uneven spots that clipper guards can't fix. For women wearing buzz cuts, this can look extra clean when paired with minimal makeup and simple outfits. Keep the line-up short - too long makes it look overdone.
Start with a 1/2 to 5/8-inch top buzz. Then ask for a high fade that begins at the top of the ears and blends upward smoothly. Request a line-up with rounded corners at the hairline and temples, and keep the neckline natural. At home, use a soft brush to remove any tiny clippings, and keep product off the hairline so it doesn't smear.
Try thisIf you get ingrowns easily, ask for the line-up to be done with a light pass rather than shaving it down to bare skin.
Watch outAvoid sharp, long corners on the hairline; it looks like a barber trend that's grown out badly.
17. High Fade with Two-Tone Top Length (1/2 to 3/4 Blend)
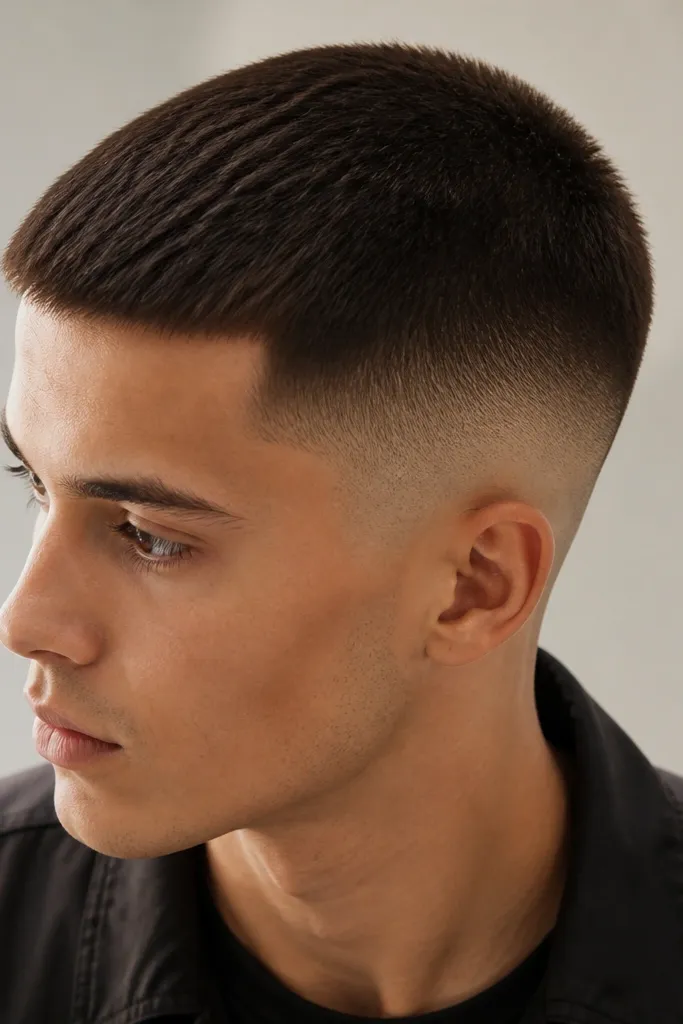
This is a clean, fashion-meets-practical cut that keeps interest without longer hair. The front sits closer to 3/4 inch while the back is nearer 1/2 inch, and the transition is blended so it doesn't look like a step. The high fade makes the top length difference show up clearly. It's flattering if your forehead is on the larger side because the extra front length balances it. If you have thick hair, this cut reduces bulk at the back so it doesn't flop or stick up.
Start by cutting the back of the top to 1/2 inch with a guard. Then cut the front to 3/4 inch and blend the transition with clipper over-comb so it stays smooth. Request a high fade that starts at the upper ear and stays tight through the temples. Style by using a tiny matte paste and pressing the front slightly forward so the length difference is intentional.
Try thisTake your haircut photo from the front and the side; the two-tone effect is easier to judge from angles.
Watch outAvoid a hard step between lengths; it reads like a mistake when it grows out.
18. High Fade with Razor-Smooth Temple Finish
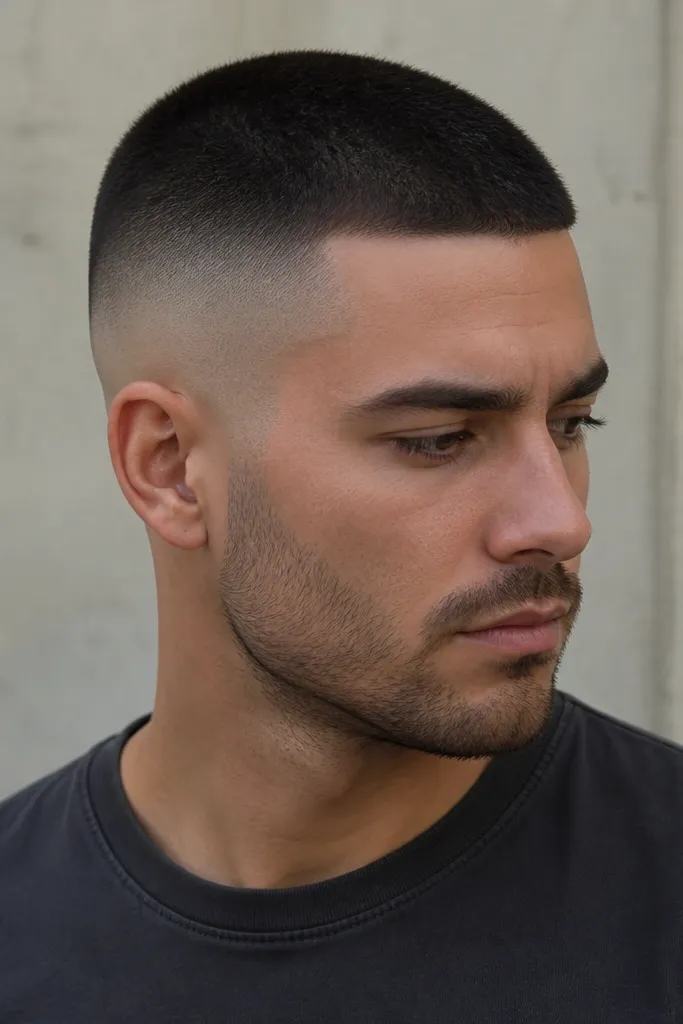
This is the "fresh barber day" look that stays good for a couple weeks. The high fade is blended, but the temples get a razor-smooth finish so the sides look sharp when you're in bright light. It's great if you want the bold appearance to show in photos because the temple area catches light cleanly. This works best with short top lengths (1/2 to 5/8 inch) because the contrast doesn't get messy. If your skin is sensitive, tell your barber to keep the temple finish light so you don't get irritation that ruins the look.
Start with a 1/2-inch top buzz. Then request a high fade that blends up from the upper ear and ask for a razor-clean finish at the temples only. Keep the rest of the fade blended - no extra hard lines. At home, avoid heavy aftershave for 24 hours; use a bland moisturizer instead so your temples don't get red.
Try thisIf you get bumps, switch to a gentle fragrance-free post-shave balm the same day.
Watch outAvoid asking for a razor finish across the entire sides; it looks raw and grows out uneven.
19. High Fade with Rounded Sideburns and Ear Framing
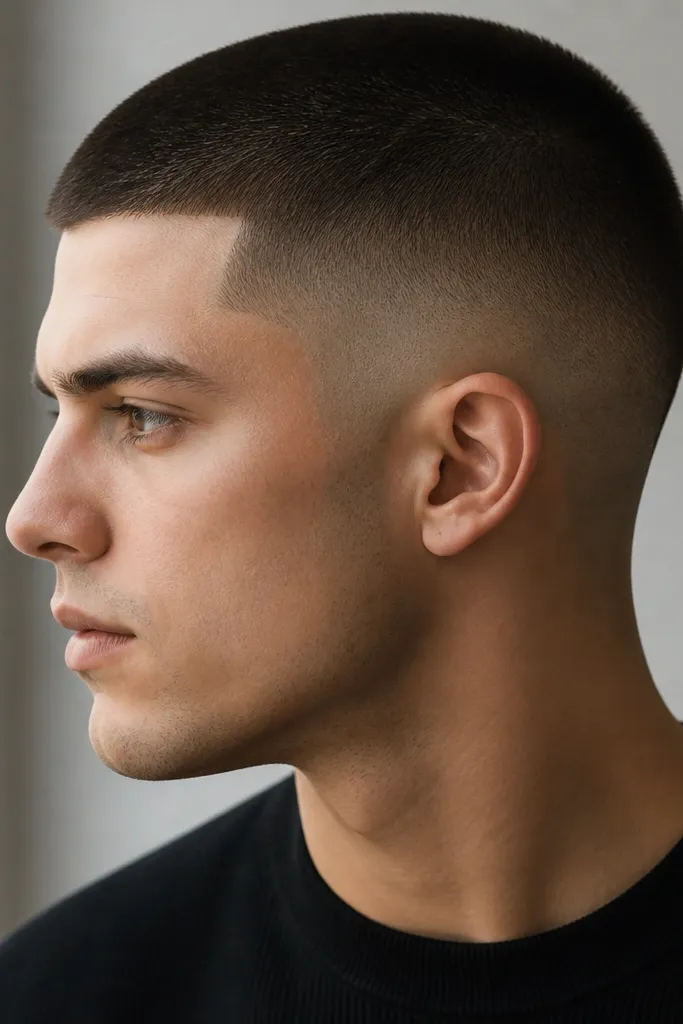
Ear framing is the detail that makes a buzz cut mens seasonal evergreen look expensive. This style keeps the high fade blended and shapes the sideburn area in a rounded way so it follows your ear curve. The top stays short, around 1/2 to 3/4 inch, so the head shape looks balanced. If you have ears that stick out, the rounded sideburn finish helps pull the silhouette in. It's also flattering if your jawline is softer because the rounded framing doesn't create harsh angles.
Start with a uniform buzz on top at 5/8 inch. Then ask for a high fade that starts at the top of the ears and blends up, with the barber shaping the sideburn area to round off the edges. Keep the neckline natural and don't add extra lines near the sideburns. Style by smoothing the top with your hands and skipping shine products so the fade stays the star.
Try thisIf you notice the fade looks uneven around the ear, ask for a quick mirror fix before you pay - that area is easy to correct immediately.
Watch outAvoid squared-off sideburn corners; they catch light and make the fade look like it was cut too fast.
20. High Fade with Winter-Friendly Slight Top Length (1-Inch Dome)
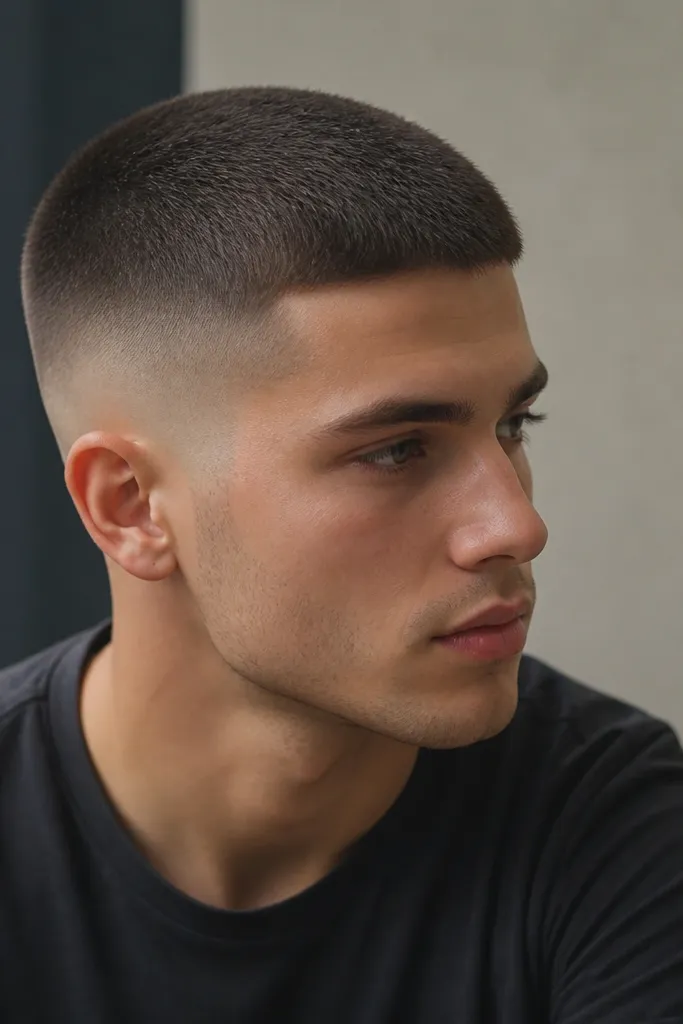
Cold weather makes hair feel drier and more flyaway, so this is my winter go-to. The top is around 1 inch, and it's cut so it forms a gentle dome rather than sticking up. The high fade keeps the silhouette clean and prevents the extra top length from making your head look wide. If you wear beanies or hoodies, this length sits well under them without flattening into awkward patches. It also looks good on both straight and wavy hair because the extra length gives the hair something to hold.
Start by cutting the top to 1 inch, then ask the barber to shape a soft dome with a light blend at the crown. Request a high fade that starts at the top of the ear and blends upward with tight guard steps. Keep the temples blended - no harsh skin edge needed. At home, use a matte cream the size of a pea, rub between hands, then press the dome flat for five seconds and leave it alone.
Try thisBefore you go out in cold air, warm your hands and press the top - it helps the cut settle into a clean shape.
Watch outAvoid slicking it with oil; the dome will look greasy under winter lighting.